> ## Documentation Index
> Fetch the complete documentation index at: https://docs.threataware.com/llms.txt
> Use this file to discover all available pages before exploring further.
# Access Control & Governance
> Roles, teams, Single Sign-On (SSO), data-level permissions, and audit — control who sees what in Protect
## The four default roles
Every Protect tenant ships with four built-in roles. These are visible at [Settings → Roles](/settings/roles) marked as **Default Roles** ("These are roles provided by default in the ThreatAware platform. Default roles cannot be edited").
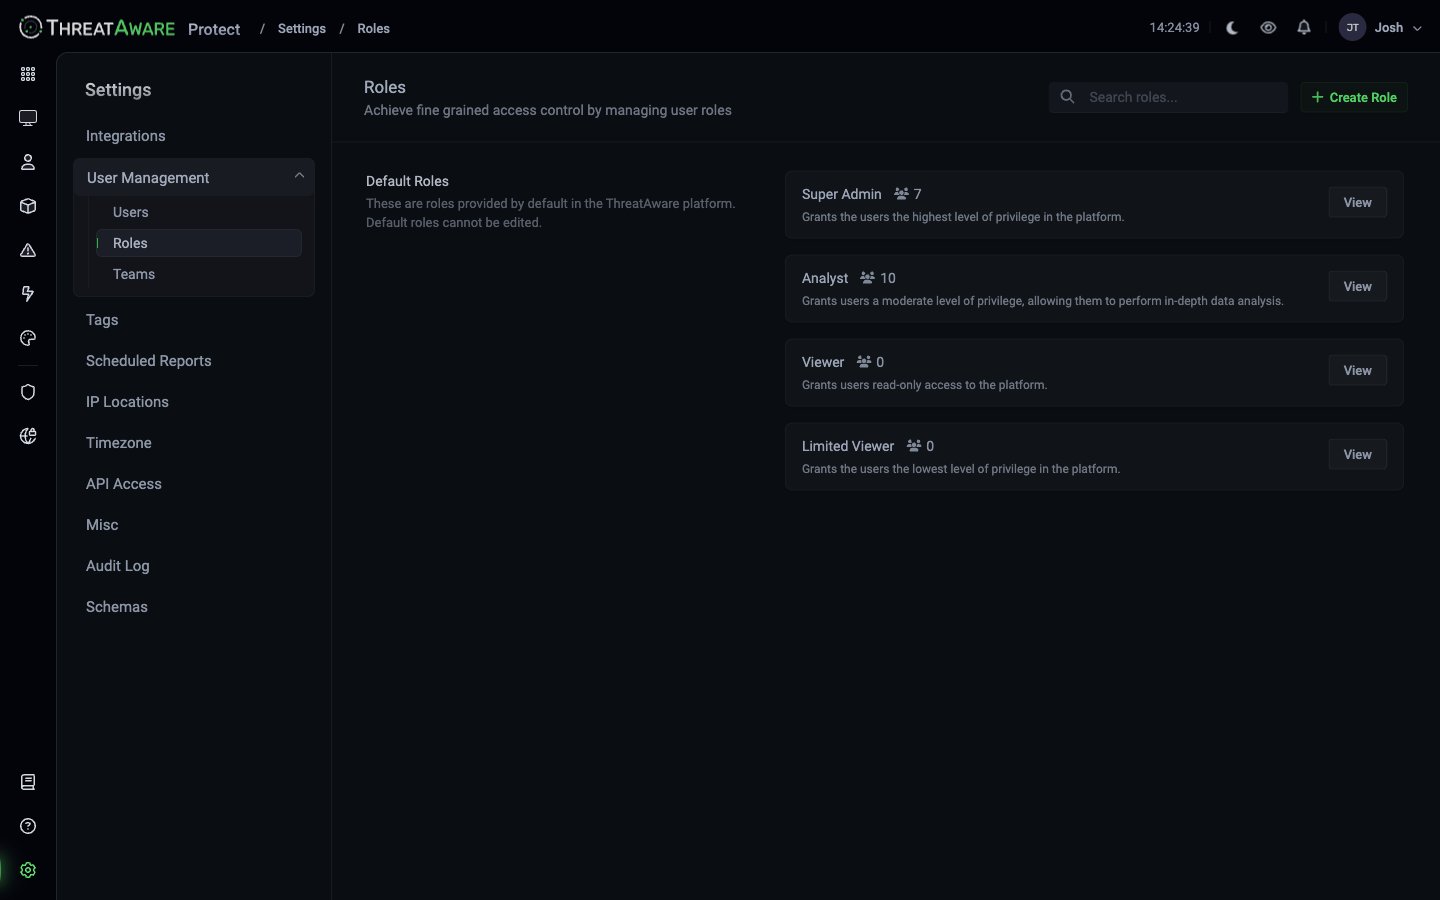 | Role | Tagline | Typical users |
| ------------------ | ------------------------------------------------------------------------------------------- | ----------------------------------------------------------- |
| **Super Admin** | Grants the users the highest level of privilege in the platform | Platform owners, IT leadership, initial implementation team |
| **Analyst** | Grants users a moderate level of privilege, allowing them to perform in-depth data analysis | SOC analysts, security engineers, IT operations |
| **Viewer** | Grants users read-only access to the platform | Compliance, audit, leadership requiring visibility only |
| **Limited Viewer** | Grants the users the lowest level of privilege in the platform | External parties, narrowly-scoped reviewers |
Default roles cannot be edited. To customise permissions, click **+ Create Role** and define a new role from scratch.
## Custom roles
The **+ Create Role** flow at [Settings → Roles](/settings/roles) lets you define a role with granular permissions across these axes:
| Permission area | Examples |
| ---------------------- | ----------------------------------------------- |
| **Device visibility** | All devices / filtered subset by tag / location |
| **Issue visibility** | All / by severity / by integration |
| **Action management** | View only / Create / Manage / Pause |
| **Reporting** | View / Export / Schedule |
| **Integrations** | View / Configure / Connect |
| **Studio (Reporting)** | View apps / Edit apps / Publish |
| **Settings** | None / Subset / All |
| **User management** | None / Invite / Manage roles |
| **Audit log** | None / View / Export |
Custom roles often map to organisational structure:
* *"MSP Technician — Client Acme"* — view devices only with `tags:Acme`, no settings access
* *"Desktop Engineer — EMEA"* — view EMEA devices, create Actions, no integration config
* *"External Auditor"* — view all device counts + compliance reports, no Personally Identifiable Information (PII) fields, no exports for 60 days
Keep the role count manageable. 4 defaults + 4-6 custom is plenty for most organisations. Granular requirements are better served by **data filters** on the user rather than proliferating roles.
## Teams
[Settings → Teams](/settings/teams) defines logical groups for collaboration and sharing.
| Role | Tagline | Typical users |
| ------------------ | ------------------------------------------------------------------------------------------- | ----------------------------------------------------------- |
| **Super Admin** | Grants the users the highest level of privilege in the platform | Platform owners, IT leadership, initial implementation team |
| **Analyst** | Grants users a moderate level of privilege, allowing them to perform in-depth data analysis | SOC analysts, security engineers, IT operations |
| **Viewer** | Grants users read-only access to the platform | Compliance, audit, leadership requiring visibility only |
| **Limited Viewer** | Grants the users the lowest level of privilege in the platform | External parties, narrowly-scoped reviewers |
Default roles cannot be edited. To customise permissions, click **+ Create Role** and define a new role from scratch.
## Custom roles
The **+ Create Role** flow at [Settings → Roles](/settings/roles) lets you define a role with granular permissions across these axes:
| Permission area | Examples |
| ---------------------- | ----------------------------------------------- |
| **Device visibility** | All devices / filtered subset by tag / location |
| **Issue visibility** | All / by severity / by integration |
| **Action management** | View only / Create / Manage / Pause |
| **Reporting** | View / Export / Schedule |
| **Integrations** | View / Configure / Connect |
| **Studio (Reporting)** | View apps / Edit apps / Publish |
| **Settings** | None / Subset / All |
| **User management** | None / Invite / Manage roles |
| **Audit log** | None / View / Export |
Custom roles often map to organisational structure:
* *"MSP Technician — Client Acme"* — view devices only with `tags:Acme`, no settings access
* *"Desktop Engineer — EMEA"* — view EMEA devices, create Actions, no integration config
* *"External Auditor"* — view all device counts + compliance reports, no Personally Identifiable Information (PII) fields, no exports for 60 days
Keep the role count manageable. 4 defaults + 4-6 custom is plenty for most organisations. Granular requirements are better served by **data filters** on the user rather than proliferating roles.
## Teams
[Settings → Teams](/settings/teams) defines logical groups for collaboration and sharing.
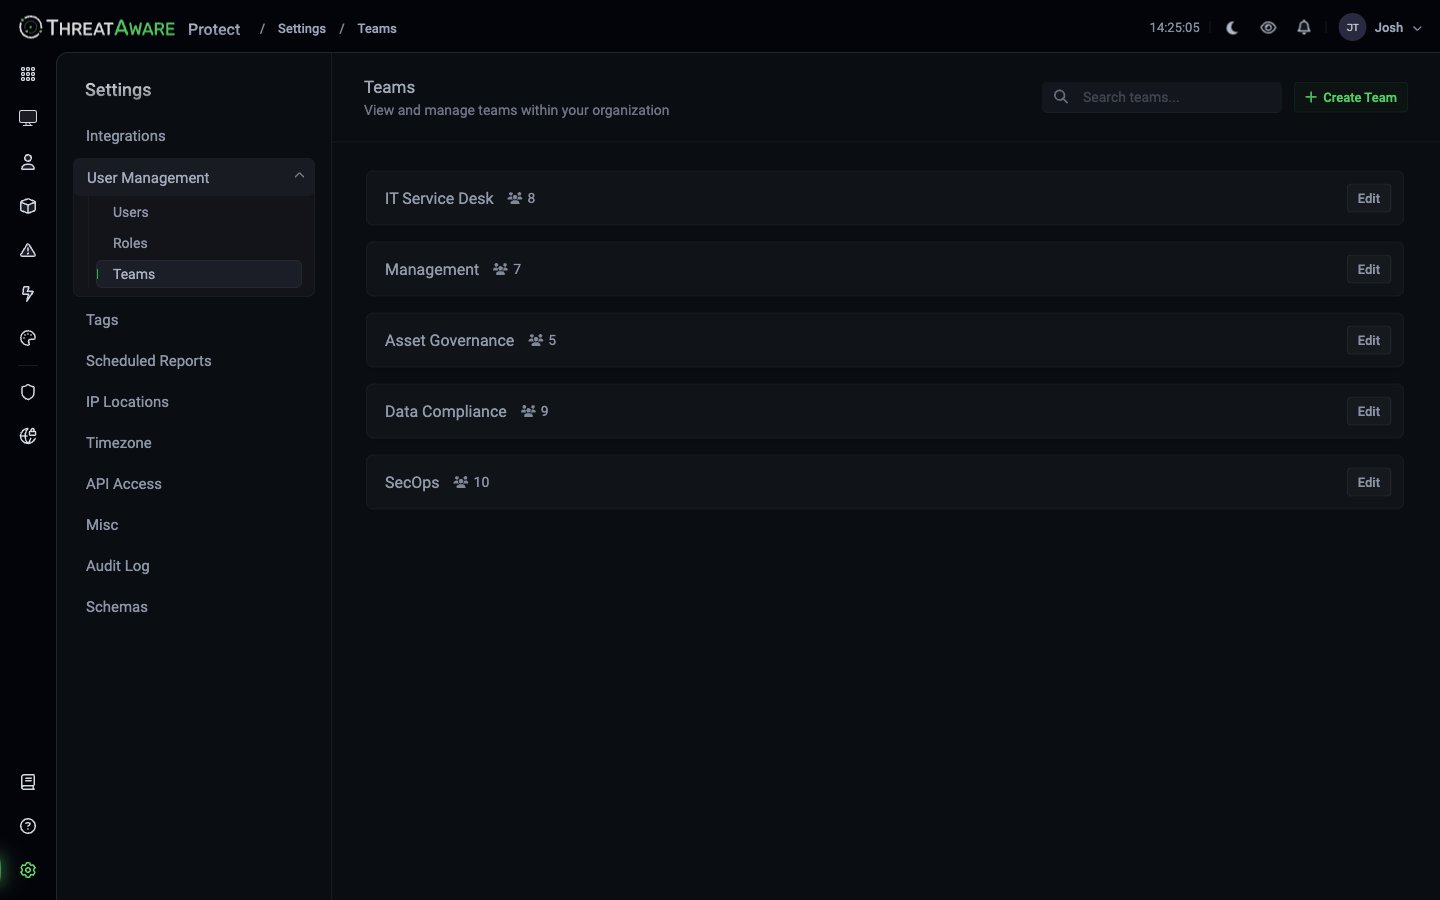 Examples:
| Team | Member count |
| ---------------- | ------------ |
| IT Service Desk | 8 |
| Management | 7 |
| Asset Governance | 5 |
| Data Compliance | 9 |
| SecOps | 10 |
### What Teams enable
* **Saved view sharing**: when you save a view, "Team" visibility lets you pick one or more teams
* **Action ownership**: Actions can be assigned to a team rather than an individual
* **Studio app sharing**: apps published to a team are visible only to that team
* **Notifications routing**: alerts route to the team's nominated channel
A user can belong to multiple teams.
## SSO
Protect supports SSO via:
| Provider | Status |
| ----------------------------------------------------------------------------- | ----------------------------------------------- |
| Microsoft Entra ID / Azure AD | Supported with self-service auto-setup |
| Okta | Supported (manual configuration by ThreatAware) |
| Generic Security Assertion Markup Language (SAML) 2.0 / OpenID Connect (OIDC) | Available — contact your account team |
### Entra ID setup
**Global Admin required** to authorise the initial setup application. The application itself only requests read-only permissions, but creating an Enterprise Application in Entra ID requires Global Admin consent.
\[Settings → Single Sign-On] (from the gear icon path).
Click **Enable Single Sign-On**. A dialog appears; click **Authorize**. You're redirected to Microsoft, sign in as Global Admin, consent.
Critical: the setup application must propagate before stage 2.
Click **Enable** in stage 2. Protect automatically creates the actual SSO Enterprise Application in your tenant. No manual SAML/OIDC configuration needed.
Existing Protect users whose `mail` attribute matches a user in Entra ID get SSO automatically. **Matching is on the `mail` property, not the User Principal Name (UPN)** — verify your users have `mail` populated.
### User management with SSO
User access lives in Protect, not Entra ID:
* Add users at [Settings → Users](/settings/users) and tick **Enable SSO**
* Removing a user (or disabling SSO on them) automatically removes them from the Entra ID application
* Break-glass accounts (without SSO) are still supported
### Auto-provisioning mode
For organisations preferring group-based access from Entra ID:
* Contact Protect support to enable auto-provisioning
* Assign users or groups to the ThreatAware Enterprise Application in Entra ID
* Users are auto-created in Protect with the **Limited Viewer** role
* An admin must upgrade roles in Protect afterwards
### Okta
Okta SSO is supported but requires manual setup by Protect engineering. Contact support with your Okta tenant details to begin.
## Tags drive data-level access
Tags are the primary lever for scoping what a user sees. A user's **data filter** is almost always a tag clause — `tags:Client-Acme`, `tags:End-User`, `tags:EMEA` — that intersects with every grid (Devices, Issues, User Inventory, Software, even Reporting data sources) for that user.
Because tag membership is rule-driven (see [Tags & Logic Engine](/tags-and-logic-engine)), access control follows the business rules automatically: a new device entering the `Acme` tag pool immediately becomes visible to the MSP-Tech-Acme role, with no manual permission edit.
The Coverage Explorer at [Settings → Tags](/settings/tags) is the right place to verify tag membership before assigning data filters — confirm the population matches who should see it.
## Data-level permissions
Even within a role, you can scope what an individual user sees:
```text theme={null}
User: MSP Tech John
Filter: tags:Client-Acme
Result: sees only Client-Acme devices everywhere
```
The filter applies to **every grid** in Protect — Devices, Issues, User Inventory, Software, even Studio data sources.
```text theme={null}
User: UK IT Manager
Filter: location.country:United Kingdom
```
```text theme={null}
User: Server admin
Filter: tags:Server
```
The `metadata.device_type` field has tenant-defined values (see [Query Syntax](/reference/query-syntax#device-type-values)). Use tags for portable role filters.
```text theme={null}
User: Desktop Engineer — France
Filter: location.country:France AND tags:End-User
```
### Field-level hiding
Some fields can be hidden from specific roles independently of row-level filtering:
Hide `lastUser.email`, `lastUser.department`, `metadata.serial_number` from a Contractor role.
Hide `system.qualys.*`, `system.tenable.*` from a Help Desk role.
Hide `metadata.serial_number`, `macAddress` from an External Auditor role.
## API access
The Protect API uses API keys managed at [Settings → API Access](/settings/api-access). Keys are sent in the `X-ThreatAware-ApiKey` request header. Tokens:
* Have a **name** and a fixed **expiration** of 1 day / 1 week / 1 month / Never (no custom-date option)
* Are shown once at creation — copy and store securely
* Inherit the permissions of the user that created them
* Hover the row to reveal **Disable key** (suspends without deleting) or **Delete key** (terminal, after a Confirm dialog)
The API surface mirrors the UI — every grid in the app has a corresponding API endpoint. See the [API Reference](/api-reference/introduction).
## Audit Log
Every meaningful action is logged at [Settings → Audit Log](/settings/audit-log):
| Logged | Examples |
| --------------------- | ------------------------------------------------------------ |
| User authentication | Login, logout, SSO challenges |
| Data access | View opened, X-Ray accessed, export performed |
| Configuration changes | Role created/edited, integration connected, tag rule changed |
| Action lifecycle | Action created/paused/edited/deleted |
| Automation execution | Webhook fired, email sent, ticket created |
### Filtering the audit log
The audit log has a plain-text search box at the top of the grid (it is **not** the field-based query language used on Devices / Issues / Users). For more structured filtering, export and filter externally — or use the API. See [Settings → Audit Log](/settings/audit-log) for column-level details.
### SIEM integration
For SIEM ingest, the recommended path is to pull from the API. Webhook and scheduled-export options may also be available depending on tenant configuration — confirm with your account team.
## Session management
Multiple concurrent sessions are allowed. For Entra ID SSO tenants, conditional access policies on the Microsoft side (including device-trust, location, and risk-based controls, plus session-lifetime caps) apply on top of any Protect-side timeouts.
## MFA enforcement
Protect does **not** surface tenant-side MFA enforcement controls in the current product. MFA is delegated to the upstream identity provider:
* **Entra ID / Azure AD SSO** — enforce MFA in your Entra ID Conditional Access policies. Protect honours whatever Entra returns.
* **Okta SSO** — enforce MFA in your Okta sign-on policy.
* **Password sign-in** (non-SSO tenants) — the Roles permission tree was inspected and **contains no MFA-related permission, idle timeout, IP restriction, or device-trust toggle**. Use Entra/Okta SSO as the recommended MFA path.
Verified by opening Super Admin → View at [Settings → Roles](/settings/roles) and enumerating the full permission tree (Data Visibility, Studio, Device Inventory, Action Center, Vitals, User Inventory, Browser Extension, Reports, User Management, Settings) — no MFA category is present.
## Best practices
Default new users to **Limited Viewer** or a tight custom role. Upgrade explicitly when need is demonstrated.
Review [Settings → Users](/settings/users) for the "Never logged in" / "Last logged in N days ago" badges and deactivate dormant accounts.
Don't use a person's API token for production automation. Create a dedicated service-account user with a narrow role and a long-lived API token, and document the owner.
Set up an Action that emails security leadership whenever the audit log shows role creation, integration disconnect, or large export.
Maintain a simple table: role × permission × who-it's-for. Review annually.
## Cross-references
User list and SSO state
Default + custom roles
Collaboration groups
Token management
Activity history
Full permission matrix
Examples:
| Team | Member count |
| ---------------- | ------------ |
| IT Service Desk | 8 |
| Management | 7 |
| Asset Governance | 5 |
| Data Compliance | 9 |
| SecOps | 10 |
### What Teams enable
* **Saved view sharing**: when you save a view, "Team" visibility lets you pick one or more teams
* **Action ownership**: Actions can be assigned to a team rather than an individual
* **Studio app sharing**: apps published to a team are visible only to that team
* **Notifications routing**: alerts route to the team's nominated channel
A user can belong to multiple teams.
## SSO
Protect supports SSO via:
| Provider | Status |
| ----------------------------------------------------------------------------- | ----------------------------------------------- |
| Microsoft Entra ID / Azure AD | Supported with self-service auto-setup |
| Okta | Supported (manual configuration by ThreatAware) |
| Generic Security Assertion Markup Language (SAML) 2.0 / OpenID Connect (OIDC) | Available — contact your account team |
### Entra ID setup
**Global Admin required** to authorise the initial setup application. The application itself only requests read-only permissions, but creating an Enterprise Application in Entra ID requires Global Admin consent.
\[Settings → Single Sign-On] (from the gear icon path).
Click **Enable Single Sign-On**. A dialog appears; click **Authorize**. You're redirected to Microsoft, sign in as Global Admin, consent.
Critical: the setup application must propagate before stage 2.
Click **Enable** in stage 2. Protect automatically creates the actual SSO Enterprise Application in your tenant. No manual SAML/OIDC configuration needed.
Existing Protect users whose `mail` attribute matches a user in Entra ID get SSO automatically. **Matching is on the `mail` property, not the User Principal Name (UPN)** — verify your users have `mail` populated.
### User management with SSO
User access lives in Protect, not Entra ID:
* Add users at [Settings → Users](/settings/users) and tick **Enable SSO**
* Removing a user (or disabling SSO on them) automatically removes them from the Entra ID application
* Break-glass accounts (without SSO) are still supported
### Auto-provisioning mode
For organisations preferring group-based access from Entra ID:
* Contact Protect support to enable auto-provisioning
* Assign users or groups to the ThreatAware Enterprise Application in Entra ID
* Users are auto-created in Protect with the **Limited Viewer** role
* An admin must upgrade roles in Protect afterwards
### Okta
Okta SSO is supported but requires manual setup by Protect engineering. Contact support with your Okta tenant details to begin.
## Tags drive data-level access
Tags are the primary lever for scoping what a user sees. A user's **data filter** is almost always a tag clause — `tags:Client-Acme`, `tags:End-User`, `tags:EMEA` — that intersects with every grid (Devices, Issues, User Inventory, Software, even Reporting data sources) for that user.
Because tag membership is rule-driven (see [Tags & Logic Engine](/tags-and-logic-engine)), access control follows the business rules automatically: a new device entering the `Acme` tag pool immediately becomes visible to the MSP-Tech-Acme role, with no manual permission edit.
The Coverage Explorer at [Settings → Tags](/settings/tags) is the right place to verify tag membership before assigning data filters — confirm the population matches who should see it.
## Data-level permissions
Even within a role, you can scope what an individual user sees:
```text theme={null}
User: MSP Tech John
Filter: tags:Client-Acme
Result: sees only Client-Acme devices everywhere
```
The filter applies to **every grid** in Protect — Devices, Issues, User Inventory, Software, even Studio data sources.
```text theme={null}
User: UK IT Manager
Filter: location.country:United Kingdom
```
```text theme={null}
User: Server admin
Filter: tags:Server
```
The `metadata.device_type` field has tenant-defined values (see [Query Syntax](/reference/query-syntax#device-type-values)). Use tags for portable role filters.
```text theme={null}
User: Desktop Engineer — France
Filter: location.country:France AND tags:End-User
```
### Field-level hiding
Some fields can be hidden from specific roles independently of row-level filtering:
Hide `lastUser.email`, `lastUser.department`, `metadata.serial_number` from a Contractor role.
Hide `system.qualys.*`, `system.tenable.*` from a Help Desk role.
Hide `metadata.serial_number`, `macAddress` from an External Auditor role.
## API access
The Protect API uses API keys managed at [Settings → API Access](/settings/api-access). Keys are sent in the `X-ThreatAware-ApiKey` request header. Tokens:
* Have a **name** and a fixed **expiration** of 1 day / 1 week / 1 month / Never (no custom-date option)
* Are shown once at creation — copy and store securely
* Inherit the permissions of the user that created them
* Hover the row to reveal **Disable key** (suspends without deleting) or **Delete key** (terminal, after a Confirm dialog)
The API surface mirrors the UI — every grid in the app has a corresponding API endpoint. See the [API Reference](/api-reference/introduction).
## Audit Log
Every meaningful action is logged at [Settings → Audit Log](/settings/audit-log):
| Logged | Examples |
| --------------------- | ------------------------------------------------------------ |
| User authentication | Login, logout, SSO challenges |
| Data access | View opened, X-Ray accessed, export performed |
| Configuration changes | Role created/edited, integration connected, tag rule changed |
| Action lifecycle | Action created/paused/edited/deleted |
| Automation execution | Webhook fired, email sent, ticket created |
### Filtering the audit log
The audit log has a plain-text search box at the top of the grid (it is **not** the field-based query language used on Devices / Issues / Users). For more structured filtering, export and filter externally — or use the API. See [Settings → Audit Log](/settings/audit-log) for column-level details.
### SIEM integration
For SIEM ingest, the recommended path is to pull from the API. Webhook and scheduled-export options may also be available depending on tenant configuration — confirm with your account team.
## Session management
Multiple concurrent sessions are allowed. For Entra ID SSO tenants, conditional access policies on the Microsoft side (including device-trust, location, and risk-based controls, plus session-lifetime caps) apply on top of any Protect-side timeouts.
## MFA enforcement
Protect does **not** surface tenant-side MFA enforcement controls in the current product. MFA is delegated to the upstream identity provider:
* **Entra ID / Azure AD SSO** — enforce MFA in your Entra ID Conditional Access policies. Protect honours whatever Entra returns.
* **Okta SSO** — enforce MFA in your Okta sign-on policy.
* **Password sign-in** (non-SSO tenants) — the Roles permission tree was inspected and **contains no MFA-related permission, idle timeout, IP restriction, or device-trust toggle**. Use Entra/Okta SSO as the recommended MFA path.
Verified by opening Super Admin → View at [Settings → Roles](/settings/roles) and enumerating the full permission tree (Data Visibility, Studio, Device Inventory, Action Center, Vitals, User Inventory, Browser Extension, Reports, User Management, Settings) — no MFA category is present.
## Best practices
Default new users to **Limited Viewer** or a tight custom role. Upgrade explicitly when need is demonstrated.
Review [Settings → Users](/settings/users) for the "Never logged in" / "Last logged in N days ago" badges and deactivate dormant accounts.
Don't use a person's API token for production automation. Create a dedicated service-account user with a narrow role and a long-lived API token, and document the owner.
Set up an Action that emails security leadership whenever the audit log shows role creation, integration disconnect, or large export.
Maintain a simple table: role × permission × who-it's-for. Review annually.
## Cross-references
User list and SSO state
Default + custom roles
Collaboration groups
Token management
Activity history
Full permission matrix